Pixel Pursuit
Description:
You are hired as a forensic analyst in a particular company and given a task to analyze network traffic of a internal mail server. This internal mail server has come under suspicion of being compromised. A series of suspicious emails have been flagged by the IT team, and they believe one of these emails contains a hidden tracker designed to leak sensitive information.
Your task is to analyze the provided packet capture (PCAP) file from the company’s mail server traffic. One of the email looks suspicious compared to the others.
Category: Forensic
Flag format: CTF{flag}
Solutions:
1. From the analytics tab, view the protocol hierarchy of the PCAP
Based from the question, it require us to analyze the network traffic which contain data of email transfer. With this information, we could dig deeper on SMTP and more importantly crave out packets containing Internet Message Format (IMF) data.
2. Understand how IMF data and pixel tracking in emails
Based on Wireshark’s Wiki, IMF is the format in which text messages are sent across the Internet. SMTP represents the message envelope, whereas IMF represents the letter within the envelope. It includes the sender, recipients, subject, and dates. While IMF only supports text messages, it may be extended with MIME_multipart to accommodate multi-media communications.
With that, we could include attachments, applications and HTML encoded text. Typically, email tracking pixel is encoded within the HTML which acts like a beacon. This tracking image is 1×1-pixel image, nearly invisible to the naked eye. The purpose of this email tracking pixel can be both useful and malicious as it able to collect data from the receipent’s endpoint.
3. Extract the message text contain from IMF packets with tshark
1
tshark -Y "imf" -T fields -e text -r pixel-pursuit.pcapng
This will output all the email message body from the packets, we could be more specific as we knew pixel tracking contain image source HTML element in the message.
1
tshark -Y "imf" -T fields -e text -r pixel-pursuit.pcapng | grep "<img"
Output:
1
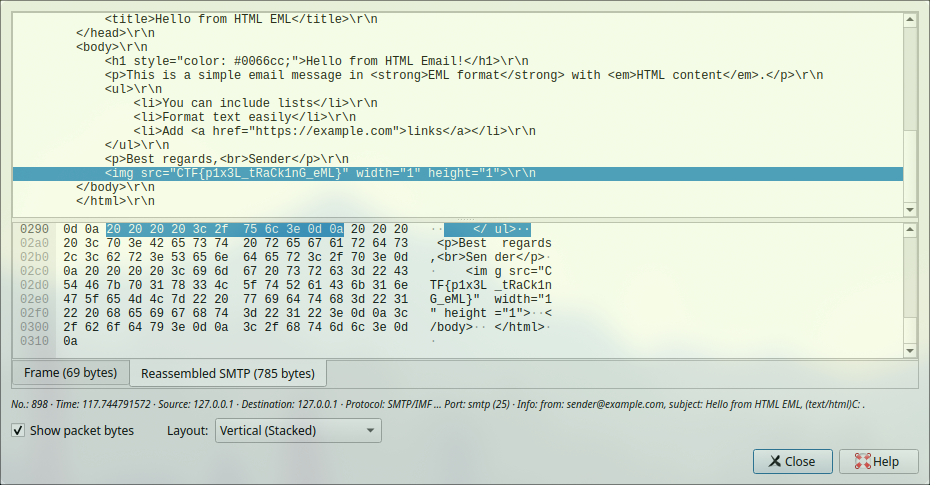
Timestamps,<!DOCTYPE html>\\r\\n,<html lang="en">\\r\\n,<head>\\r\\n,    <meta charset="UTF-8">\\r\\n,    <title>Hello from HTML EML</title>\\r\\n,</head>\\r\\n,<body>\\r\\n,    <h1 style="color: #0066cc;">Hello from HTML Email!</h1>\\r\\n,    <p>This is a simple email message in <strong>EML format</strong> with <em>HTML content</em>.</p>\\r\\n,    <ul>\\r\\n,        <li>You can include lists</li>\\r\\n,        <li>Format text easily</li>\\r\\n,        <li>Add <a href="https://example.com">links</a></li>\\r\\n,    </ul>\\r\\n,    <p>Best regards,<br>Sender</p>\\r\\n,    <img src="CTF{p1x3L_tRaCk1nG_eML}" width="1" height="1">\\r\\n,</body>\\r\\n,</html>\\r\\n
We have successfully found the flag.
The flag also can be viewed in packet stream by reassembled bytes
- Flag:
CTF{p1x3L_tRaCk1nG_eML}
Challenge Creation:
1. Setup the environment
For this challenge, I used telnet to send the smtp packets to the receiver but eveything is done in localhost. For this challenge, I have generated 101 emails and 100 are dummy emails, so this tool is very helpful to generate random emails. Next up, is sending all those emails to IMAP server also and the end with ThunderBird to view the email messages. With that, this python script is used to send all the generated messages with the interval of 2 seconds. Well, why the interval of 2 seconds you may ask, is to manually send the flagged pixel tracking email to the receipient.
2. Turn on wireshark before initiate the sender script
This process roughly takes about 3-4 minutes, but within the first half, I have sent the flagged email. After the email transmission process has completed, just as a troll, ping localhost with a string of fake flag.


